教你轻松搞定xml自定义Preference
2016-03-16 小文字
前言
开发中免不了有些设置页面,有设置页面没问题,android 自带Preference相关的api可以很快的实现一套基于xml配置的设置页面;
但是这样就行了么?
现实往往不是这样的,由于UI样式风格布局问题,经常会导致用默认的Preference无法达到需求的效果(这里暂不讨论需求的合理性-_-!)。
方案分析
解决上述问题有很多办法;
- A.如果只是UI样式的问题,可以考虑基于PreferenceXX的各种控件做微调;
- B.自定义Preference,也就是写一写符合需求的子控件;
- C.抛弃Preference,纯手工用view搞定;
- D.仿照Preference,自己实现一套轻量级的,符合需求的模板;
这四种方案各有长短,可以根据自身情况综合考虑,所谓复用,移植,个性化不可兼得;
ABC三种方案没什么特别,不再赘述,主要看一下方案D,虽然此方案笔者已经在项目中多处稳定使用,但是每个项目需求不同,仅作参考之用.
自己动手,搞定一切
首先确立D方案,需要解决的问题:
- 我们知道Preference好用是因为他的配置化,根据约定编写xml就可以得到对应的UI视图;我们当然也要这样,用xml简化视图创建;
- 配置选项对应的基础视图可以自行指定;
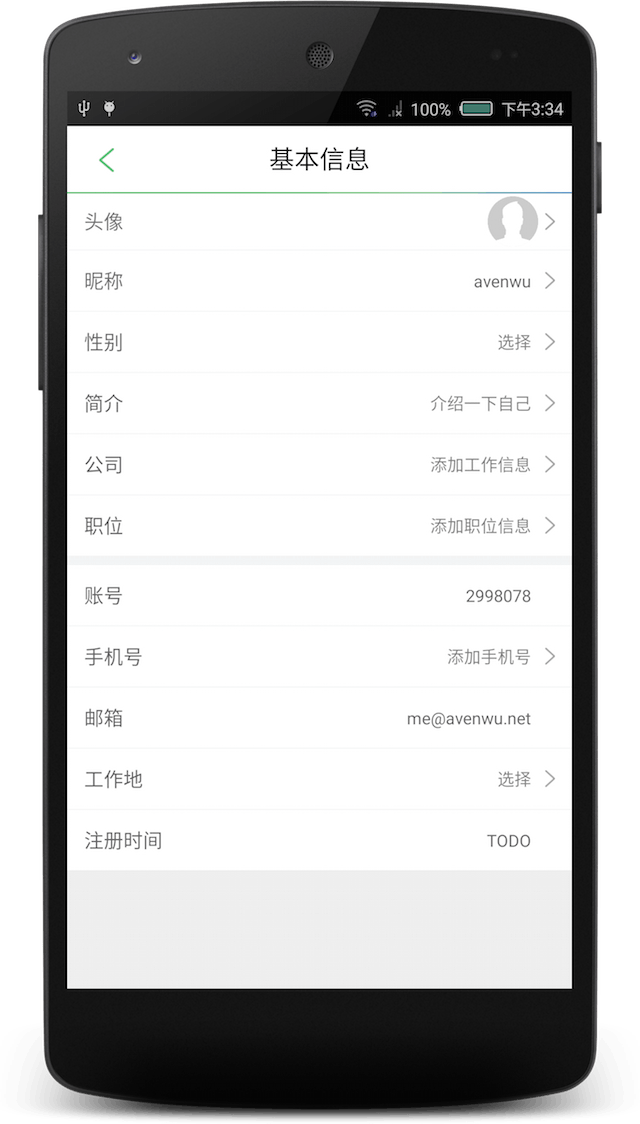
主要xml读取,生成合适菜单项,然后配合指定的基础视图元素,批量生成配置页面内的配置项,举个🌰(取自项目案例,仅供参考):
XML定义与解析
先来看看XML,我们需要定义三个元素,页面(Screen),配置项(item), 段落分割(divider)有了这三个元素,就可以定义出一个基本页面,如:
<?xml version="1.0" encoding="utf-8"?>
<Screen xmlns:app="http://schemas.android.com/apk/res-auto">

    <item
        app:menu_id="@+id/item_nickname"
        app:menu_label="@string/profile_label_nickname" />
    <item
        app:menu_id="@+id/item_sex"
        app:menu_label="性别" />

    <item
        app:menu_id="@+id/item_introduction"
        app:menu_label="简介" />
    <item
        app:menu_id="@+id/item_company"
        app:menu_label="公司" />

    <divider />

    <item
        app:menu_id="@+id/item_account"
        app:menu_indicator_enable="false"
        app:menu_label="账号" />

    <item
        app:menu_id="@+id/item_register_time"
        app:menu_indicator_enable="false"
        app:menu_label="注册时间" />
</Screen>
定义了xml,需要解析并生产合适的视图
parser = getContext().getResources().getXml(id);
attrs = Xml.asAttributeSet(parser);
int type;
int depth = parser.getDepth();

while (((type = parser.next()) != XmlPullParser.END_TAG || parser.getDepth() > depth) &&
        type != XmlPullParser.END_DOCUMENT) {

    if (type != XmlPullParser.START_TAG) {
        continue;
    }

    String name = parser.getName();
    if (!assertName.equals(name)) {
        throw new IllegalArgumentException("The Screen defined in " +
                getContext().getResources().getResourceEntryName(id) + " must be a <" +
                assertName + " />");
    }

    if (KEY_SCREEN.equals(name)) {
        parseItem(parser, attrs);
    } else {
        throw new IllegalArgumentException("Unknown Screen name " + parser.getName() +
                " in " + getContext().getResources().getResourceEntryName(id));
    }
}
这里用到了XmlPullParser,由于标签定义的很简单,只有Screen,item, divider,首先解析xml是否为一个正确的页面配置文件,也就是要求第一个开始标签是Screen, 满足既可以开始解析后面的item,否则直接抛出错误提示;
解析item的操作是类似的
int type;
int depth = parser.getDepth();
while (((type = parser.next()) != XmlPullParser.END_TAG || parser.getDepth() > depth) &&
        type != XmlPullParser.END_DOCUMENT) {

    if (type != XmlPullParser.START_TAG) {
        continue;
    }
    String name = parser.getName();

    if (KEY_ITEM.equals(name)) {
        TypedArray a = resources.obtainAttributes(attrs, R.styleable.ActionLayout_Item);
        int id = a.getResourceId(R.styleable.ActionLayout_Item_menu_id, -1);
        String title = a.getString(R.styleable.ActionLayout_Item_menu_label);
        String subTitle = a.getString(R.styleable.ActionLayout_Item_menu_sub_label);
        int iconId = a.getResourceId(R.styleable.ActionLayout_Item_menu_icon, -2);
        int iconIndicator = a.getResourceId(R.styleable.ActionLayout_Item_menu_indicator_icon,
                -3);
        String count = a.getString(R.styleable.ActionLayout_Item_menu_count);
        int customLayoutId = -1;
        if (a.hasValue(R.styleable.ActionLayout_Item_menu_custom_layout)) {
            customLayoutId = a.getResourceId(R.styleable.ActionLayout_Item_menu_custom_layout, -1);
        }
        boolean indicatorEnable = a.getBoolean(R.styleable.ActionLayout_Item_menu_indicator_enable, true);
        LogAssist.d(Enum.Developer.CHAOBIN, Enum.Module.LOG, String.format(FORMAT, id, title, iconId, iconIndicator, count));
        a.recycle();
        MenuItem item = new MenuItem();
        item.id = id;
        item.label = title;
        item.subLabel = subTitle;
        item.icon = getDrawable(iconId);
        item.indicatorIcon = iconIndicator > 0 ? getDrawable(iconIndicator) : null;
        item.count = count;
        item.customLayoutId = customLayoutId;
        item.indicatorEnable = indicatorEnable;
        addMenu(item);
    } else if (KEY_DIVIDER.equals(name)) {
        addMenu(true);
    } else {
        LogAssist.d(Enum.Developer.CHAOBIN, Enum.Module.LOG, "Unknown tag found when " +
                "parsing Screen xml: <" + name + "/>");
    }
}
在正确获取到Attribute后,可以开始愉快玩耍,和平时自定义View时读取配置信息一样,通过TypedArray获取我们在xml内配置的数据,并生成相应的model实例;
最后当然是生成View,这个没什么好说的,我们已经读取到了所有的配置信息,可以直接循环遍历批量生成视图, 下面是部分示意代码;
for (Object item : mItems) {
	if (item instanceof MenuItem) {
	    MenuItem menuItem = (MenuItem) item;
	    View view;
	    if (menuItem.customLayoutId != -1) {
	        view = inflater.inflate(menuItem.customLayoutId, null);
	    } else {
	        view = inflater.inflate(mItemLayout, null);
	        //TODO set view
	    }
	    view.setId(menuItem.id);
	    view.setTag(item);
	    view.setOnClickListener(this);
	    addView(view, LayoutParams.MATCH_PARENT, LayoutParams.WRAP_CONTENT);
	    if (item != mItems.get(mItems.size() - 1)) {
	        View line = new View(getContext());
	        line.setBackgroundColor(getResources().getColor(R.color.grey_background));
	        final int height = (int) TypedValue.applyDimension
	                (TypedValue.COMPLEX_UNIT_DIP, 0.5f, getResources().getDisplayMetrics());
	        addView(line, LayoutParams.MATCH_PARENT, Math.max(height, 2));
	    }
	} else if (item instanceof Boolean && (Boolean) item) {
	    View view = inflater.inflate(mDividerLayout, null);
	    addView(view, LayoutParams.MATCH_PARENT, LayoutParams.WRAP_CONTENT);
	}
}
小结
用好配置文件可以做很多又有意思的事,在开发中实现需求的方案很多,多走不寻常的路,发现更大的自由空间;