Multidex启动与安装分析
2017-09-21 小文字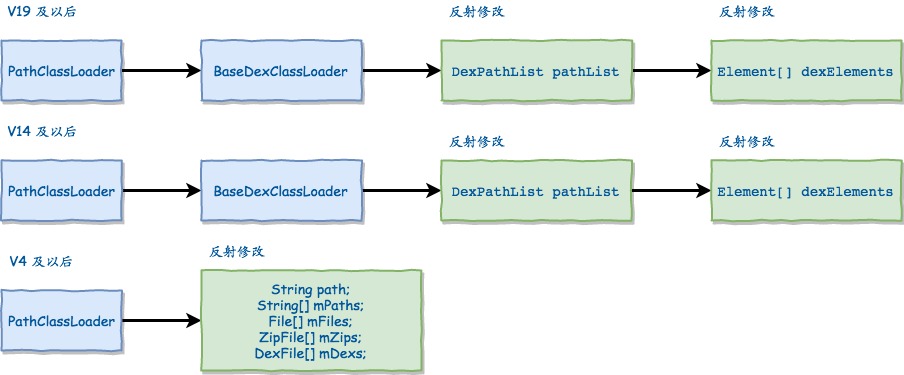
背景
自从Google推出了官方的multidex1扩展库,巨型App进行分包就变得简单了不少;本文主要从源码角度分析multidex的实现逻辑。
dex
大家对dex动态插入原理应该都有所了解。根据不同Andorid版本的ClassLoader存在的差异,通过反射进行dex数组的编辑操作,将主dex之外的从dex依次插入就可以实现很多事情,比如动态加载,分包等等,当然核心原理是这样,实际上实现的时候又是怎么处理的呢?
下面我们基于multidex的源码开始分析。
- multidex: com.android.support:multidex:1.0.1
- gradle: com.android.tools.build:gradle:2.3.3
整体流程
dex解压
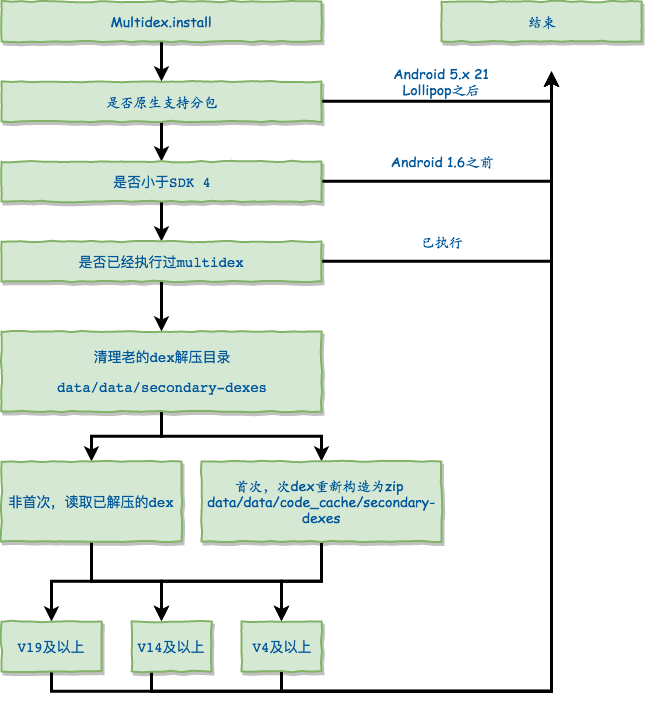
安装multidex只有一句话MultiDex.install(this/*application context*/), 这也是分析的入口。整个解压过程分为如下步骤:
VM版本判断
这一步主要和android的版本差异决定,根据官网说明:
MultiDex patches the application context class loader in order to load classes from more than one dex file. The primary classes.dex must contain the classes necessary for calling this class methods. Secondary dex files named classes2.dex, classes3.dex… found in the application apk will be added to the classloader after first call to install(Context).
This library provides compatibility for platforms with
API level 4 through 20. This library does nothing on newer versions of the platform which provide built-in support for secondary dex files.
用版本来表示的话,相当于Multidex的生效范围是 1.6至4.4,而实际工作中一般适配都是从4.0开始,4.0之前的基本忽略。因此VM版本判断就是来确认需不需要进行手动的dex安装,从21开始系统默认至此对多个dex的处理,所以不需要执行dex的相关逻辑。
Log.i("MultiDex", "install");
if(IS_VM_MULTIDEX_CAPABLE) {
    Log.i("MultiDex", "VM has multidex support, MultiDex support library is disabled.");
}
其中IS_VM_MULTIDEX_CAPABLE变量的赋值是根据系统参数读取的。
static {
    //...
    IS_VM_MULTIDEX_CAPABLE = isVMMultidexCapable(System.getProperty("java.vm.version"));
}

static boolean isVMMultidexCapable(String versionString) {
    boolean isMultidexCapable = false;
    if(versionString != null) {
        Matcher matcher = Pattern.compile("(\\d+)\\.(\\d+)(\\.\\d+)?").matcher(versionString);
        if(matcher.matches()) {
            try {
                int e = Integer.parseInt(matcher.group(1));
                int minor = Integer.parseInt(matcher.group(2));
                isMultidexCapable = e > 2 || e == 2 && minor >= 1;
            } catch (NumberFormatException var5) {
                ;
            }
        }
    }

    Log.i("MultiDex", "VM with version " + versionString + (isMultidexCapable?" has multidex support":" does not have multidex support"));
    return isMultidexCapable;
}
根据系统变量java.vm.version的版本号,从代码来看,实际上VM版本2.1级以后的版本都不需要multidex辅助逻辑。
09-22 10:18:48.106 20992-20992/com.qihoo.appstore I/MultiDex: VM with version 2.1.0 has multidex support
09-22 10:18:48.107 20992-20992/com.qihoo.appstore I/MultiDex: install
09-22 10:18:48.107 20992-20992/com.qihoo.appstore I/MultiDex: VM has multidex support, MultiDex support library is disabled.
install去重
判断完了版本之后,还会继续判断一下当前apk是否已经执行过了multidex。
String apkPath = e.sourceDir;
if(installedApk.contains(apkPath)) {
    return;
}

installedApk.add(apkPath);
因此即使我们执行多次install也只有一次生效,我们一旦开始执行,会将apk的路径加入到Set集合中。
清除老dex
这一步笔者推测是版本兼容,从预定义的常量来看,dex加压后的存放位置有两个,这里会将老版本存放的目录下的dex清除。
清除操作事件上就是遍历目录然后执行删除操作。老的dex目录是:OLD_SECONDARY_FOLDER_NAME = "secondary-dexes";
private static void clearOldDexDir(Context context) throws Exception {
    File dexDir = new File(context.getFilesDir(), "secondary-dexes");
    if(dexDir.isDirectory()) {
        Log.i("MultiDex", "Clearing old secondary dex dir (" + dexDir.getPath() + ").");
        File[] files = dexDir.listFiles();
        if(files == null) {
            Log.w("MultiDex", "Failed to list secondary dex dir content (" + dexDir.getPath() + ").");
            return;
        }

        File[] arr$ = files;
        int len$ = files.length;

        for(int i$ = 0; i$ < len$; ++i$) {
            File oldFile = arr$[i$];
            Log.i("MultiDex", "Trying to delete old file " + oldFile.getPath() + " of size " + oldFile.length());
            if(!oldFile.delete()) {
                Log.w("MultiDex", "Failed to delete old file " + oldFile.getPath());
            } else {
                Log.i("MultiDex", "Deleted old file " + oldFile.getPath());
            }
        }

        if(!dexDir.delete()) {
            Log.w("MultiDex", "Failed to delete secondary dex dir " + dexDir.getPath());
        } else {
            Log.i("MultiDex", "Deleted old secondary dex dir " + dexDir.getPath());
        }
    }
}
解压dex
上面的步骤严格来说都是以前前戏,解压dex,肯定需要将apk中的dex拿出来放到某个目录下面。
通过代码分析,我们知道,存放dex的目录为:data/data/code_cache/secondary-dexes
SECONDARY_FOLDER_NAME = "code_cache" + File.separator + "secondary-dexes";
File dexDir = new File(e.dataDir, SECONDARY_FOLDER_NAME);
可以找一个安装了的分包apk的手机验证一下:
root@hlte:/data/data/cn.hacktons.multidex.demo/code_cache/secondary-dexes #
-rw-r--r-- u0_a206  u0_a206    483112 2017-09-21 16:33 cn.hacktons.multidex.demo-1.apk.classes2.dex
-rw------- u0_a206  u0_a206    181061 2017-09-21 16:33 cn.hacktons.multidex.demo-1.apk.classes2.zip
可以看到这个目录下有两种文件,一个是dex,一个是zip,两者前缀相同。而这个zip实际上就是一个包含一个dex的压缩包。 如果次dex有多个那么这里会成倍的出现。
整个解压操作的代码全部位于MultiDexExtractor.java中。他的执行逻辑大致是这样的:
- 从第2个dex开始遍历
- 每个classN.dex构造为一个新的zip,zip内部只包含一个dex文件,名字为classes.dex
- 最多重试3次,每个dex的转换有三次重试,如果三次重试后仍然失败,直接抛出异常结束。
所以我们可以知道,在解压过程中,主dex是不会解压出来,同时每一个次dex都重新构造为一个包含dex的zip,这样后续安装的时候就可以直接安装zip。
private static List<File> performExtractions(File sourceApk, File dexDir) throws IOException {
    String extractedFilePrefix = sourceApk.getName() + ".classes";
    prepareDexDir(dexDir, extractedFilePrefix);
    ArrayList files = new ArrayList();
    ZipFile apk = new ZipFile(sourceApk);

    try {
        int e = 2;

        for(ZipEntry dexFile = apk.getEntry("classes" + e + ".dex"); dexFile != null; dexFile = apk.getEntry("classes" + e + ".dex")) {
            String fileName = extractedFilePrefix + e + ".zip";
            File extractedFile = new File(dexDir, fileName);
            files.add(extractedFile);
            Log.i("MultiDex", "Extraction is needed for file " + extractedFile);
            int numAttempts = 0;
            boolean isExtractionSuccessful = false;

            while(numAttempts < 3 && !isExtractionSuccessful) {
                ++numAttempts;
                extract(apk, dexFile, extractedFile, extractedFilePrefix);
                isExtractionSuccessful = verifyZipFile(extractedFile);
                Log.i("MultiDex", "Extraction " + (isExtractionSuccessful?"success":"failed") + " - length " + extractedFile.getAbsolutePath() + ": " + extractedFile.length());
                if(!isExtractionSuccessful) {
                    extractedFile.delete();
                    if(extractedFile.exists()) {
                        Log.w("MultiDex", "Failed to delete corrupted secondary dex \'" + extractedFile.getPath() + "\'");
                    }
                }
            }

            if(!isExtractionSuccessful) {
                throw new IOException("Could not create zip file " + extractedFile.getAbsolutePath() + " for secondary dex (" + e + ")");
            }

            ++e;
        }
    } finally {
        try {
            apk.close();
        } catch (IOException var16) {
            Log.w("MultiDex", "Failed to close resource", var16);
        }

    }

    return files;
}
解压过程的主要逻辑基本就是这样,有一点奇怪的是,笔者并没有发现dex的文件是怎么创建的,这个文件和zip的前缀一致,文件大小略有差异,zip解压后的内部的dex和外面这个dex倒是大小差不多。 并且两种文件的创建时间几乎是一致的。
root@hlte:/data/data/cn.hacktons.multidex.demo/code_cache/secondary-dexes #
-rw-r--r-- u0_a206  u0_a206    483112 2017-09-21 16:33 cn.hacktons.multidex.demo-1.apk.classes2.dex
-rw------- u0_a206  u0_a206    181061 2017-09-21 16:33 cn.hacktons.multidex.demo-1.apk.classes2.zip
dex安装
解压完dex之后,就开始安装到classloader中 根据前面的步骤,我们可以直接解压dex并返回包含解压后zip文件的List,如果是非首次安装,且没有改动,那么就不需要从原始apk中解压,直接从dex在磁盘中的目录加载就可以。
private static List<File> loadExistingExtractions(Context context, File sourceApk, File dexDir) throws IOException {
    Log.i("MultiDex", "loading existing secondary dex files");
    String extractedFilePrefix = sourceApk.getName() + ".classes";
    int totalDexNumber = getMultiDexPreferences(context).getInt("dex.number", 1);
    ArrayList files = new ArrayList(totalDexNumber);

    for(int secondaryNumber = 2; secondaryNumber <= totalDexNumber; ++secondaryNumber) {
        String fileName = extractedFilePrefix + secondaryNumber + ".zip";
        File extractedFile = new File(dexDir, fileName);
        if(!extractedFile.isFile()) {
            throw new IOException("Missing extracted secondary dex file \'" + extractedFile.getPath() + "\'");
        }

        files.add(extractedFile);
        if(!verifyZipFile(extractedFile)) {
            Log.i("MultiDex", "Invalid zip file: " + extractedFile);
            throw new IOException("Invalid ZIP file.");
        }
    }

    return files;
}
校验zip
在解压后,我们会使用到新创建的zip,因此会有比较多zip有效性判断,判断实际上就是尝试构造ZipFile,如果能成功构建则通过判断。
private static boolean checkValidZipFiles(List<File> files) {
    Iterator i$ = files.iterator();

    File file;
    do {
        if(!i$.hasNext()) {
            return true;
        }

        file = (File)i$.next();
    } while(MultiDexExtractor.verifyZipFile(file));

    return false;
}

static boolean verifyZipFile(File file) {
    try {
        ZipFile ex = new ZipFile(file);

        try {
            ex.close();
            return true;
        } catch (IOException var3) {
            Log.w("MultiDex", "Failed to close zip file: " + file.getAbsolutePath());
        }
    } catch (ZipException var4) {
        Log.w("MultiDex", "File " + file.getAbsolutePath() + " is not a valid zip file.", var4);
    } catch (IOException var5) {
        Log.w("MultiDex", "Got an IOException trying to open zip file: " + file.getAbsolutePath(), var5);
    }

    return false;
}
V19以上
最后就是安装所有的次dex了。
private static void installSecondaryDexes(ClassLoader loader, File dexDir, List<File> files) throws IllegalArgumentException, IllegalAccessException, NoSuchFieldException, InvocationTargetException, NoSuchMethodException, IOException {
    if(!files.isEmpty()) {
        if(VERSION.SDK_INT >= 19) {
            MultiDex.V19.install(loader, files, dexDir);
        } else if(VERSION.SDK_INT >= 14) {
            MultiDex.V14.install(loader, files, dexDir);
        } else {
            MultiDex.V4.install(loader, files);
        }
    }

}
可以看到有版本控制逻辑。
private static void install(ClassLoader loader, List<File> additionalClassPathEntries, File optimizedDirectory) throws IllegalArgumentException, IllegalAccessException, NoSuchFieldException, InvocationTargetException, NoSuchMethodException {
    Field pathListField = MultiDex.findField(loader, "pathList");
    Object dexPathList = pathListField.get(loader);
    ArrayList suppressedExceptions = new ArrayList();
    MultiDex.expandFieldArray(dexPathList, "dexElements", makeDexElements(dexPathList, new ArrayList(additionalClassPathEntries), optimizedDirectory, suppressedExceptions));
    if(suppressedExceptions.size() > 0) {
        Iterator suppressedExceptionsField = suppressedExceptions.iterator();

        while(suppressedExceptionsField.hasNext()) {
            IOException dexElementsSuppressedExceptions = (IOException)suppressedExceptionsField.next();
            Log.w("MultiDex", "Exception in makeDexElement", dexElementsSuppressedExceptions);
        }

        Field suppressedExceptionsField1 = MultiDex.findField(loader, "dexElementsSuppressedExceptions");
        IOException[] dexElementsSuppressedExceptions1 = (IOException[])((IOException[])suppressedExceptionsField1.get(loader));
        if(dexElementsSuppressedExceptions1 == null) {
            dexElementsSuppressedExceptions1 = (IOException[])suppressedExceptions.toArray(new IOException[suppressedExceptions.size()]);
        } else {
            IOException[] combined = new IOException[suppressedExceptions.size() + dexElementsSuppressedExceptions1.length];
            suppressedExceptions.toArray(combined);
            System.arraycopy(dexElementsSuppressedExceptions1, 0, combined, suppressedExceptions.size(), dexElementsSuppressedExceptions1.length);
            dexElementsSuppressedExceptions1 = combined;
        }

        suppressedExceptionsField1.set(loader, dexElementsSuppressedExceptions1);
    }

}
根据这段代码的含义,实际上就是依次找到ClassLoader中的pathList成员,然后这个成员会有个dexElements的数组字段:
我们分析下Lollipop的ClassLoader代码, 根据multidex的逻辑我们知道这个ClassLoader事直接冲application获取的getClassLoader,然后通过递归查找一个pathList成员:
PathClassLoader, BaseDexClassLoader
最后我们知道这个成员定义在了基类BaseDexClassLoader当中:
/**
 * Base class for common functionality between various dex-based
 * {@link ClassLoader} implementations.
 */
public class BaseDexClassLoader extends ClassLoader {
    private final DexPathList pathList;
    //...
}
继续看DexPathList对象声明:
/**
 * A pair of lists of entries, associated with a {@code ClassLoader}.
 * One of the lists is a dex/resource path — typically referred
 * to as a "class path" — list, and the other names directories
 * containing native code libraries. Class path entries may be any of:
 * a {@code .jar} or {@code .zip} file containing an optional
 * top-level {@code classes.dex} file as well as arbitrary resources,
 * or a plain {@code .dex} file (with no possibility of associated
 * resources).
 *
 * <p>This class also contains methods to use these lists to look up
 * classes and resources.</p>
 */
/*package*/ final class DexPathList {
    private static final String DEX_SUFFIX = ".dex";
    /** class definition context */
    private final ClassLoader definingContext;
    /**
     * List of dex/resource (class path) elements.
     * Should be called pathElements, but the Facebook app uses reflection
     * to modify 'dexElements' (http://b/7726934).
     */
    private final Element[] dexElements;
    /** List of native library directories. */
    private final File[] nativeLibraryDirectories;
    /**
     * Exceptions thrown during creation of the dexElements list.
     */
    private final IOException[] dexElementsSuppressedExceptions;
	//...
}
注意看,我们需要的dexElements确实是个数组Element[] dexElements。同时看一下类说明注释,这里也就是为什么我们前面会看到解压dex的时候需要用一个zip来包裹一下:
Class path entries may be any of: a {@code .jar} or {@code .zip} file containing an optional top-level {@code classes.dex} file as well as arbitrary resources, or a plain {@code .dex} file (with no possibility of associated resources).
找到了数组之后,需要对愿数组进行扩容,主要是通过makeDexElements方法实例化一个新的数组,然后进行数组拷贝:
MultiDex.expandFieldArray(dexPathList, "dexElements", makeDexElements(dexPathList, new ArrayList(additionalClassPathEntries), optimizedDirectory, suppressedExceptions));

private static Object[] makeDexElements(Object dexPathList, ArrayList<File> files, File optimizedDirectory, ArrayList<IOException> suppressedExceptions) throws IllegalAccessException, InvocationTargetException, NoSuchMethodException {
    Method makeDexElements = MultiDex.findMethod(dexPathList, "makeDexElements", new Class[]{ArrayList.class, File.class, ArrayList.class});
    return (Object[])((Object[])makeDexElements.invoke(dexPathList, new Object[]{files, optimizedDirectory, suppressedExceptions}));
}
这个makeDexElement的方法比较长,这里只贴出他的方法签名;
/**
 * Makes an array of dex/resource path elements, one per element of
 * the given array.
 */
private static Element[] makeDexElements(ArrayList<File> files, File optimizedDirectory,
                                         ArrayList<IOException> suppressedExceptions) {//...
}
这个方法最终返回一个Element数组,Element实际上哟包含了DexFile等成员;
/**
 * Element of the dex/resource file path
 */
/*package*/ static class Element {
    private final File file;
    private final boolean isDirectory;
    private final File zip;
    private final DexFile dexFile;
    private ZipFile zipFile;
    private boolean initialized;
    public Element(File file, boolean isDirectory, File zip, DexFile dexFile) {
        this.file = file;
        this.isDirectory = isDirectory;
        this.zip = zip;
        this.dexFile = dexFile;
    }
最终Dexfile会建立一个VM和Dex的内存映射关系,并通过cookie来标识;
/*
 * Open a DEX file.  The value returned is a magic VM cookie.  On
 * failure, an IOException is thrown.
 */
private static native long openDexFileNative(String sourceName, String outputName, int flags);
基本的反射执行逻辑就是根据这些源代码进行操作;
V14以上
类似的,我么也看一下V14的具体代码逻辑。他的代码基本和19是一样的,唯一区别在于最后的makeDexElements方法签名不同,他没有exception的参数;
private static void install(ClassLoader loader, List<File> additionalClassPathEntries, File optimizedDirectory) throws IllegalArgumentException, IllegalAccessException, NoSuchFieldException, InvocationTargetException, NoSuchMethodException {
    Field pathListField = MultiDex.findField(loader, "pathList");
    Object dexPathList = pathListField.get(loader);
    MultiDex.expandFieldArray(dexPathList, "dexElements", makeDexElements(dexPathList, new ArrayList(additionalClassPathEntries), optimizedDirectory));
}

private static Object[] makeDexElements(Object dexPathList, ArrayList<File> files, File optimizedDirectory) throws IllegalAccessException, InvocationTargetException, NoSuchMethodException {
    Method makeDexElements = MultiDex.findMethod(dexPathList, "makeDexElements", new Class[]{ArrayList.class, File.class});
    return (Object[])((Object[])makeDexElements.invoke(dexPathList, new Object[]{files, optimizedDirectory}));
}
这里我们看的是Jelly Bean的源代码:DexPathList
/**
 * Makes an array of dex/resource path elements, one per element of
 * the given array.
 */
private static Element[] makeDexElements(ArrayList<File> files,
        File optimizedDirectory) {}
V4以上
最后是看一下v4到v14直接的情况,这个差异大一些。可以看到需要反射操作的成员就比较多了,不是一个数组的问题。
private static void install(ClassLoader loader, List<File> additionalClassPathEntries) throws IllegalArgumentException, IllegalAccessException, NoSuchFieldException, IOException {
    int extraSize = additionalClassPathEntries.size();
    Field pathField = MultiDex.findField(loader, "path");
    StringBuilder path = new StringBuilder((String)pathField.get(loader));
    String[] extraPaths = new String[extraSize];
    File[] extraFiles = new File[extraSize];
    ZipFile[] extraZips = new ZipFile[extraSize];
    DexFile[] extraDexs = new DexFile[extraSize];

    String entryPath;
    int index;
    for(ListIterator iterator = additionalClassPathEntries.listIterator(); iterator.hasNext(); extraDexs[index] = DexFile.loadDex(entryPath, entryPath + ".dex", 0)) {
        File additionalEntry = (File)iterator.next();
        entryPath = additionalEntry.getAbsolutePath();
        path.append(':').append(entryPath);
        index = iterator.previousIndex();
        extraPaths[index] = entryPath;
        extraFiles[index] = additionalEntry;
        extraZips[index] = new ZipFile(additionalEntry);
    }

    pathField.set(loader, path.toString());
    MultiDex.expandFieldArray(loader, "mPaths", extraPaths);
    MultiDex.expandFieldArray(loader, "mFiles", extraFiles);
    MultiDex.expandFieldArray(loader, "mZips", extraZips);
    MultiDex.expandFieldArray(loader, "mDexs", extraDexs);
}
首先是ClassLoader里面的path成员,他是一个字符串,所有的路径都是拼接在这上面的。同时还有mPaths, mFiles, mZips, mDexs三个成员需要替换。
我们Gingerbread为例,看一下源代码:
public class PathClassLoader extends ClassLoader {
    private final String path;
    private final String libPath;
    /*
     * Parallel arrays for jar/apk files.
     *
     * (could stuff these into an object and have a single array;
     * improves clarity but adds overhead)
     */
    private final String[] mPaths;
    private final File[] mFiles;
    private final ZipFile[] mZips;
    private final DexFile[] mDexs;

	//...
}
这里我们的PathClassLoader的基类不是BaseDexClassLoader而是ClassLoader,这个与前面两个是有差异的。
小结
通过不同版本的PathClassLoader分析,可以看到早最开始的实现和现在的版本已经有了很大的差异,因此在安装和解压的手需要反射操作的内容是不一样的。而Android官方对这个版本控制的处理无疑方便了我们开发者,否则的话需要我们自身去判断每个版本,并划出版本差异分割线也是比较麻烦的事情。
最后总结一下不同版本反射处理的逻辑:
- V19及以上版本,反射修改BaseDexClassLoader中的
pathList成员,他是一个DexPathList对象,然后接着修改pathList内部的dexElements数组,他是一个Element[]数组; - V14及以上同V19的主干逻辑
- V4及以上,修改最多,依次是
path,mPaths,mFiles,mZips,mDexs
-
https://developer.android.com/studio/build/multidex.html ↩