Flutter Isolate并发编程
2019-07-11 小文字
Dart执行模型
类似JavaScript,Dart属于单线程语言,在单线程这块,至少应该理解下面这些概念:
- Flutter使用Dart开发,默认也是单线程
- 一个Flutter程序启动后,创建Isolate线程
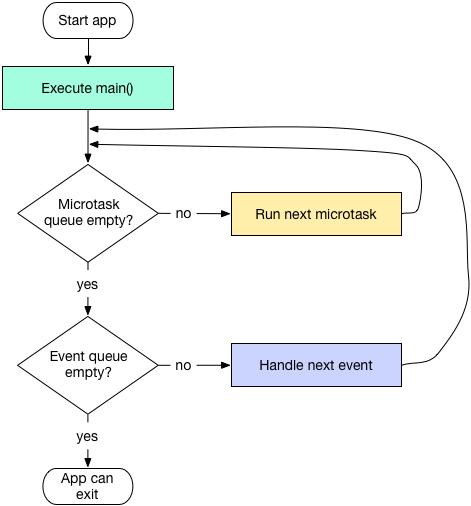
- 一个Isolate内包含两个消息队列,分别是EventLoop 和MicroTask
- 在死循环中,MicroTask优先及高于EventLoop
- Future类似于Promise ,在EventLoop中执行
- EventLoop负责事件消息,如I/O; gesture;drawing;timers;streams;等,也包括Future任务
- async/await针对的都是Future,好比Promise
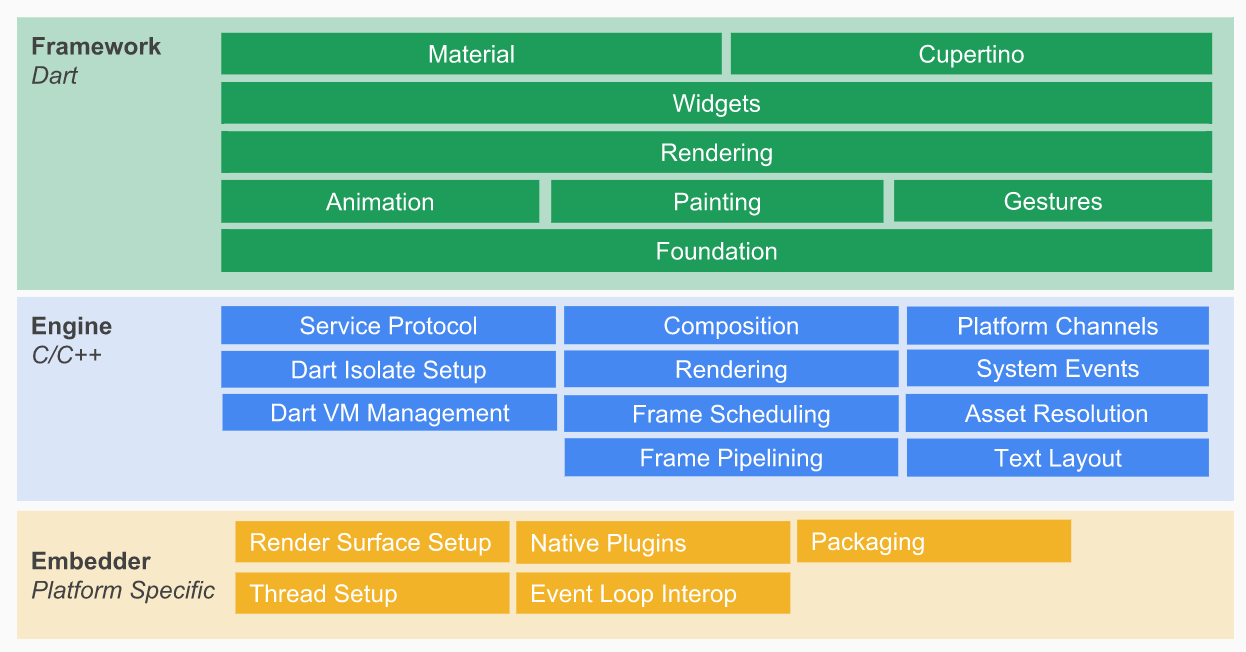
官网有张架构图可以参考下
消息循环Event Loop
消息队列采用先进先出,下面引用了几张Dart开发者网站的介绍:

将消息换成具体的类型后,类似下图:
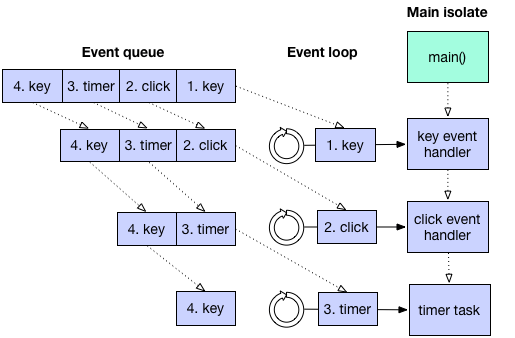
前面我们已经提到消息循环有两个队列,他们优先级关系可以抽象如下:
多线程并发
dart里面并发编程使用isolate接口,根据官方文档和代码注释我们可以掌握它的使用方法,下面一起看下。
/**
 * Concurrent programming using _isolates_:
 * independent workers that are similar to threads
 * but don't share memory,
 * communicating only via messages.
 *
 * To use this library in your code:
 *
 *     import 'dart:isolate';
 *
 * {@category VM}
 */
Isolate不等同于thread,可以从下面两个特性来加深理解:
- Isolate是Dart里的
线程,每个Isolate之间不共享内存,通过消息通信;- Dart的代码运行在Isolate中,处于同一个Isolate的代码才能相互访问;
Isolate的相关API文档并不是很明晰,更好的理解方案是直接通过一个小案例来理解:
案例
- 新建一个独立的Isolate线程,
- 在新的线程中,每间隔1秒想主线程发送消息,消息内容为当前时间戳
- 主线程收到消息后打印出接收到的信息
Isolate isolate;

// 启动新的Isolate,并监听消息
start() async {
  ReceivePort receivePort = ReceivePort();
  isolate = await Isolate.spawn(entryPoint, receivePort.sendPort, debugName: 'newIsolate');

  receivePort.listen((message) {
    debugPrint('${Isolate.current.debugName}: receive msg $message');
  });
  debugPrint('${Isolate.current.debugName}: spawn');
}

// 新Isolate入口函数
entryPoint(SendPort sendPort) {
  int counter = 0;
  Timer.periodic(Duration(seconds: 1), (Timer t) {
    debugPrint('${Isolate.current.debugName}: send msg ${counter++}');
    sendPort.send(DateTime.now());
  });
}

// 结束Isolate
void stop() {
  if (isolate != null) {
    isolate.kill(priority: Isolate.immediate);
    isolate = null;
    debugPrint('${Isolate.current.debugName}: killed isolate');
  }
}
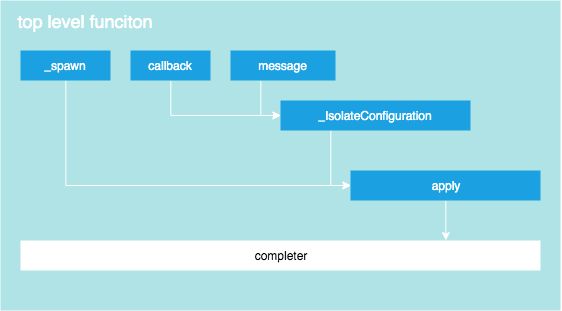
根据API使用,我们可以把上述Isolate的使用概括为下图
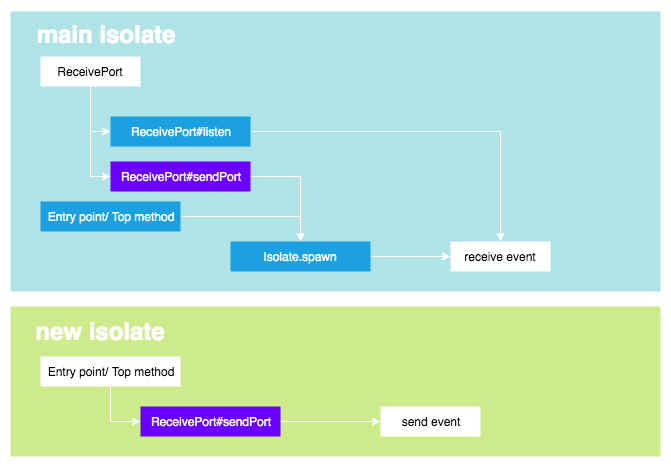
这里有一个知识点:
如何获取当前代码执行时所处的Isolate?
孵化一个新的Isolate时,可选的可以配置一个debugName,这个值可以做表意使用,但他不是唯一的。
Isolate.current是一个静态成员,可以获取到当前的线程。
以下代码可以结束用户创建的Isolate示例,但是不能结束由系统为我们创建的app所在的默认Isolate(main)>
Isolate.current.kill(priority: Isolate.immediate);
通过全局方法作为新的Isolate入口的写法比较简洁,但是要注意内存不共享的原则。
小插曲
除此之外Dart也可以通过Isolate.spawnUri来指定独立dart文件来孵化一个Isolate实例,不过该方法在Flutter内似乎并不好使:
import 'dart:async';
import 'dart:isolate';

main(List<String> args, SendPort message) {
  entryPoint(message);
}

entryPoint(SendPort sendPort) {
  int counter = 0;
  Timer.periodic(Duration(seconds: 1), (Timer t) {
    print('${Isolate.current.debugName}: send msg ${counter++}');
    sendPort.send(DateTime.now());
  });
}
执行的时候会报一些UI相关函数绑定错误,暂时没有找到解决方案,推测原因如下:
根据相关文档,我们知道一上下文的top level函数作为入口时,实际上新的isolate的代码就是当前函数所在的代码,有点类似基于当前isolate做了上下文拷贝的意思。而指定url的dart代码段仅仅包含指定代码,缺少了报错信息中的实现关系。
E/flutter ( 9241): [ERROR:flutter/runtime/dart_isolate.cc(805)] Unhandled exception:
E/flutter ( 9241): error: native function 'Window_setNeedsReportTimings' (2 arguments) cannot be found
E/flutter ( 9241): #0      Window.onReportTimings= (dart:ui/window.dart:911:7)
E/flutter ( 9241): #1      _WidgetsFlutterBinding&BindingBase&GestureBinding&ServicesBinding&SchedulerBinding.initInstances (package:flutter/src/scheduler/binding.dart:205:14)
E/flutter ( 9241): #2      _WidgetsFlutterBinding&BindingBase&GestureBinding&ServicesBinding&SchedulerBinding&PaintingBinding.initInstances (package:flutter/src/painting/binding.dart:21:11)
E/flutter ( 9241): #3      _WidgetsFlutterBinding&BindingBase&GestureBinding&ServicesBinding&SchedulerBinding&PaintingBinding&SemanticsBinding.initInstances (package:flutter/src/semantics/binding.dart:22:11)
E/flutter ( 9241): #4      _WidgetsFlutterBinding&BindingBase&GestureBinding&ServicesBinding&SchedulerBinding&PaintingBinding&SemanticsBinding&RendererBinding.initInstances (package:flutter/src/rendering/binding.dart:29:11)
E/flutter ( 9241): #5      _WidgetsFlutterBinding&BindingBase&GestureBinding&ServicesBinding&SchedulerBinding&PaintingBinding&SemanticsBinding&RendererBinding&WidgetsBinding.initInstances (package:flutter/src/widgets/binding.dart:252:11)
E/flutter ( 9241): #6      new BindingBase (package:flutter/src/foundation/binding.dart:56:5)
E/flutter ( 9241): #7      new _WidgetsFlutterBinding&BindingBase&GestureBinding (package:flutter/src/widgets/binding.dart)
E/flutter ( 9241): #8      new _WidgetsFlutterBinding&BindingBase&GestureBinding&ServicesBinding (package:flutter/src/widgets/binding.dart)
E/flutter ( 9241): #9      new _WidgetsFlutterBinding&BindingBase&GestureBinding&ServicesBinding&SchedulerBinding (package:flutter/src/widgets/binding.dart)
E/flutter ( 9241): #10     new _WidgetsFlutterBinding&BindingBase&GestureBinding&ServicesBinding&SchedulerBinding&PaintingBinding (package:flutter/src/widgets/binding.dart)
E/flutter ( 9241): #11     new _WidgetsFlutterBinding&BindingBase&GestureBinding&ServicesBinding&SchedulerBinding&PaintingBinding&SemanticsBinding (package:flutter/src/widgets/binding.dart)
E/flutter ( 9241): #12     new _WidgetsFlutterBinding&BindingBase&GestureBinding&ServicesBinding&SchedulerBinding&PaintingBinding&SemanticsBinding&RendererBinding (package:flutter/src/widgets/binding.dart)
E/flutter ( 9241): #13     new _WidgetsFlutterBinding&BindingBase&GestureBinding&ServicesBinding&SchedulerBinding&PaintingBinding&SemanticsBinding&RendererBinding&WidgetsBinding (package:flutter/src/widgets/binding.dart)
E/flutter ( 9241): #14     new WidgetsFlutterBinding (package:flutter/src/widgets/binding.dart)
E/flutter ( 9241): #15     WidgetsFlutterBinding.ensureInitialized (package:flutter/src/widgets/binding.dart:994:7)
E/flutter ( 9241): #16     runApp (package:flutter/src/widgets/binding.dart:785:25)
E/flutter ( 9241): #17     main (package:flutter_user/main.dart:29:3)
E/flutter ( 9241): #18     _startIsolate.<anonymous closure> (dart:isolate-patch/isolate_patch.dart:301:19)
E/flutter ( 9241): #19     _RawReceivePortImpl._handleMessage (dart:isolate-patch/isolate_patch.dart:172:12)
Isolate的简化版API
在Flutter中,Framework为我们封装了一套API来简化Isolate的使用。
通过将异步任务传入compute方法既可以完成Isolate的使用。
例如Http请求后,得到了了响应体,我们需要把这个较大的数据提解析为json对象,那么这个解析过程会比较耗时,利用compute,可以这样处理:
Future<List<Photo>> fetchPhotos(http.Client client) async {
  final response =
      await client.get('https://jsonplaceholder.typicode.com/photos');
  return compute(parsePhotos, response.body);
}

List<Photo> parsePhotos(String responseBody) {
  final parsed = json.decode(responseBody);
  return parsed.map<Photo>((json) => Photo.fromJson(json)).toList();
}
这个例子很前面我们收到使用的差异是,异步任务只返回一个结果,没有持续监听。时间开发中compute也满足绝大多数的场景。
相关源码如下
import 'dart:async';

import '_isolates_io.dart'
  if (dart.library.html) '_isolates_web.dart' as _isolates;

/// Signature for the callback passed to [compute].
///
/// {@macro flutter.foundation.compute.types}
///
/// Instances of [ComputeCallback] must be top-level functions or static methods
/// of classes, not closures or instance methods of objects.
///
/// {@macro flutter.foundation.compute.limitations}
typedef ComputeCallback<Q, R> = FutureOr<R> Function(Q message);

// The signature of [compute].
typedef _ComputeImpl = Future<R> Function<Q, R>(ComputeCallback<Q, R> callback, Q message, { String debugLabel });

/// Spawn an isolate, run `callback` on that isolate, passing it `message`, and
/// (eventually) return the value returned by `callback`.
///
/// This is useful for operations that take longer than a few milliseconds, and
/// which would therefore risk skipping frames. For tasks that will only take a
/// few milliseconds, consider [scheduleTask] instead.
///
/// {@template flutter.foundation.compute.types}
/// `Q` is the type of the message that kicks off the computation.
///
/// `R` is the type of the value returned.
/// {@endtemplate}
///
/// The `callback` argument must be a top-level function, not a closure or an
/// instance or static method of a class.
///
/// {@template flutter.foundation.compute.limitations}
/// There are limitations on the values that can be sent and received to and
/// from isolates. These limitations constrain the values of `Q` and `R` that
/// are possible. See the discussion at [SendPort.send].
/// {@endtemplate}
///
/// The `debugLabel` argument can be specified to provide a name to add to the
/// [Timeline]. This is useful when profiling an application.
// Remove when https://github.com/dart-lang/sdk/issues/37149 is fixed.
// ignore: prefer_const_declarations
final _ComputeImpl compute = _isolates.compute;
compute实现分析
起那么看到了compute使用非常简单,只需要传入入口函数和参数即可。下面通过源码分析下compute的具体实现。
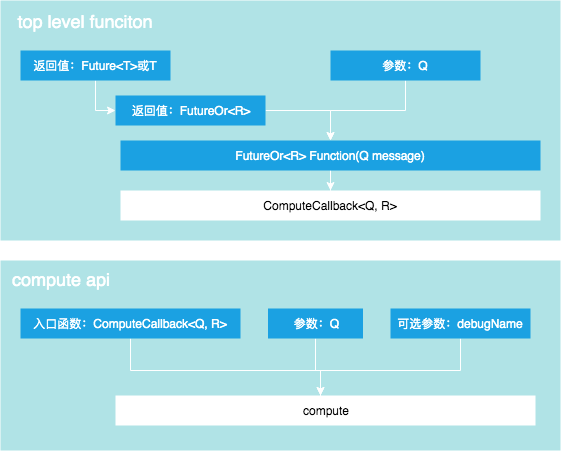
- 首先compute是一个定义的顶级函数名,类型为
_ComputeImpl - compute函数:入参为一个入口函数,一个消息参数,一个可选名字
- 入口函数必须是定义函数,不能是某个class内的成员函数
可以看到compute和我们手工使用Isolate的有些不同,只有一个返回值,没有让调用者通过listene持续监听消息,个人感觉对ReceiverPort的隐藏是compute封装的最大价值。
我们已经知道了函数定义,下面继续看函数的具体实现,Flutter中的实现在foundation/_isolate_io.dart。
完整代码不到100行,咋看起来接口套用特别多。他的本质和签名的案例一样,不过更加完备,考虑了异常的处理,并且使用了Completer来完成回调与Future的改造。
final Isolate isolate = await Isolate.spawn<_IsolateConfiguration<Q, FutureOr<R>>>(
  _spawn,
  _IsolateConfiguration<Q, FutureOr<R>>(
    callback,
    message,
    resultPort.sendPort,
    debugLabel,
    flow.id,
  ),
  errorsAreFatal: true,
  onExit: resultPort.sendPort,
  onError: errorPort.sendPort,
);
final Completer<R> result = Completer<R>();
errorPort.listen((dynamic errorData) {
  assert(errorData is List<dynamic>);
  assert(errorData.length == 2);
  final Exception exception = Exception(errorData[0]);
  final StackTrace stack = StackTrace.fromString(errorData[1]);
  if (result.isCompleted) {
    Zone.current.handleUncaughtError(exception, stack);
  } else {
    result.completeError(exception, stack);
  }
});
resultPort.listen((dynamic resultData) {
  assert(resultData == null || resultData is R);
  if (!result.isCompleted)
    result.complete(resultData);
});
整个流程的关键点如下:
