PPT的morph平滑效果与Android动画
2021-02-1 小文字Morph是什么?
PPT大家都很熟悉了,Office全家桶的成员之一,在制作高品质的演讲稿时,免不了使用动画元素。在新版本(具体哪个版本开始,笔者没有去溯源)中PowerPoint有一个转场动画叫做Morph,即变形动画或平滑动画。(Keynote也有类似特效)
morph /mɔːf/
n. 形素,语素;形态;图像变换
v. (使)图像变形;将(图像)进行合成处理;改变,变化,变形
[ 复数 morphs 过去式 morphed 过去分词 morphed 现在分词 morphing 第三人称单数 morphs ]
使用变形动画非常的操作并不复杂,却能够制作出很多炫酷的动画。关键在于前后两张PPT内同一个对象可以自定进行“映射”,“变形”。
下面两个演示效果(来源是百度搜索):


动画制作
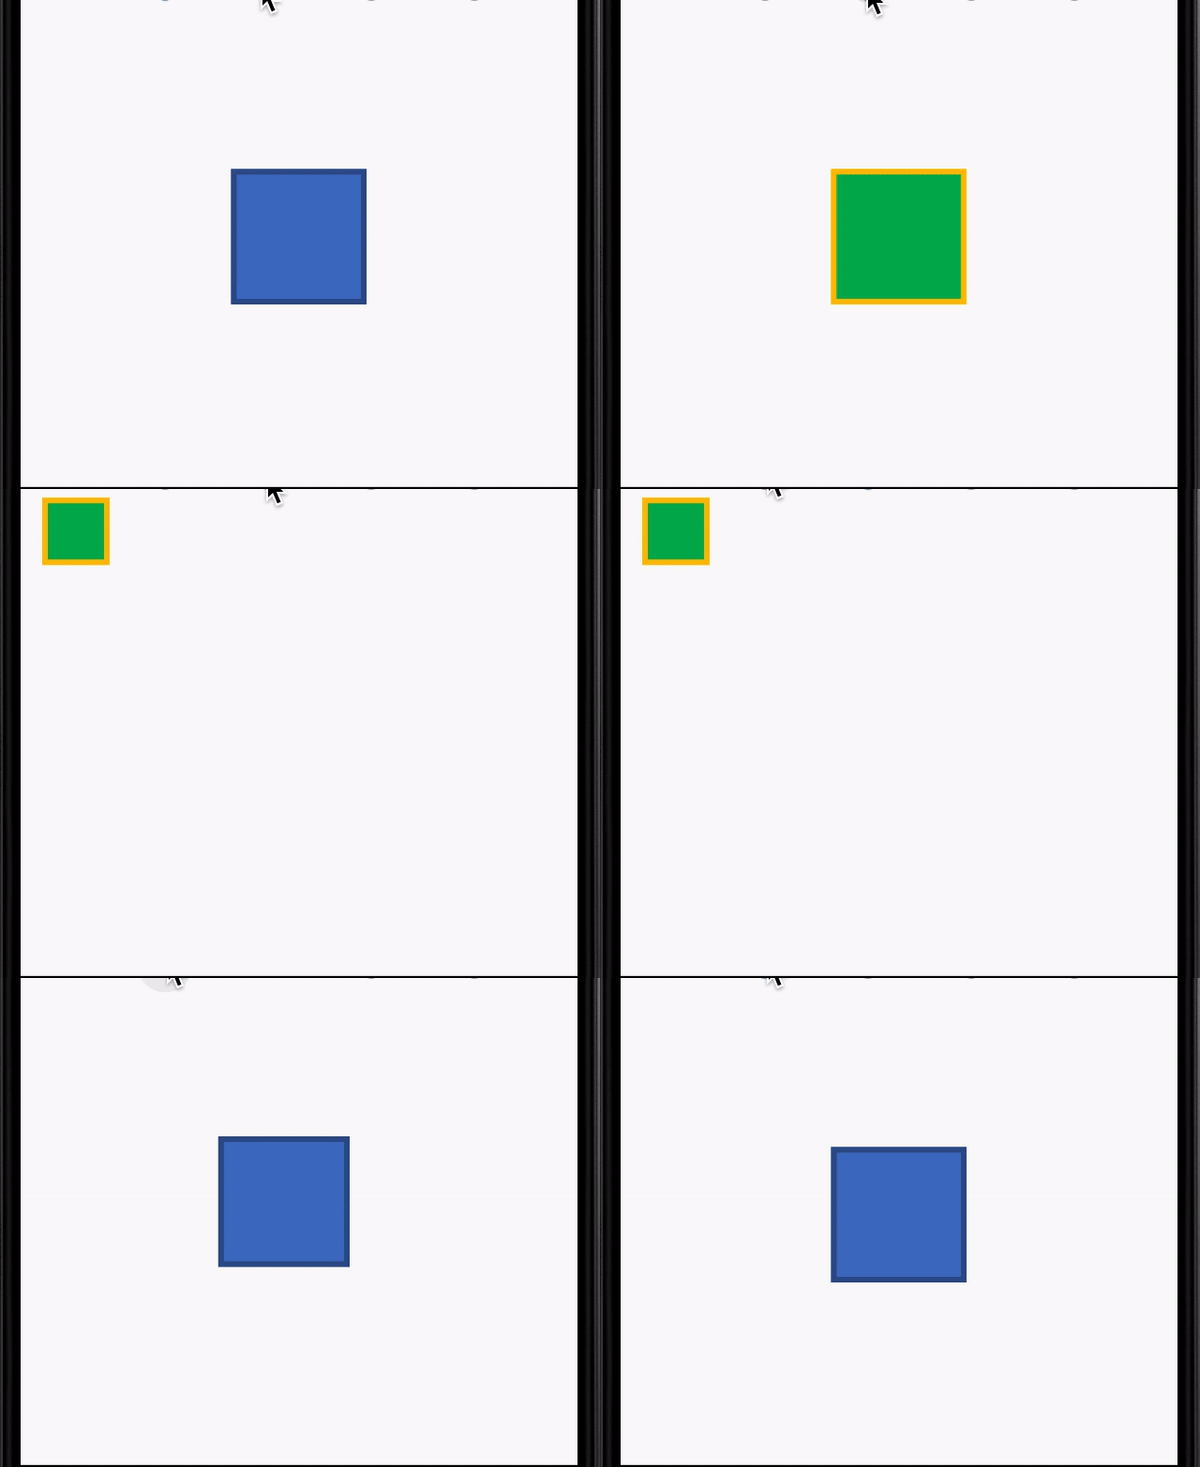
下面是我们利用ppt制作的一个正方形效果,从画布中央向左上角移动,并且等比缩小高宽,改变颜色。

细心的同学应该可以发现,这种平滑的转场动效在Android中可以通过属性动画,位移缩放动画来实现。
那么有没有其他实现方案呢?类似PPT中的简单操作?
Android提供的Transition机制可以利用两个layout来简化动画中元素的操作,类似于两页PPT中的共享元素。
Android's transition framework allows you to animate all kinds of motion in your UI by simply providing the starting layout and the ending layout.
具体使用可以参考Animate layout changes using a transition。
关键步骤如下:
- 创建Scene实例
- 创建Transition
- 执行TransitionManager.go
两个Scene布局通过xml定义,注意id要一致,否则位移动画不生效(这个即使在ppt中也类似可以通过copy保证这一点)。
scene 1
<RelativeLayout
    android:id="@+id/container"
    xmlns:android="http://schemas.android.com/apk/res/android"
    android:layout_width="match_parent"
    android:layout_height="match_parent">

    <View
        android:id="@+id/transition_square"
        android:layout_centerInParent="true"
        android:layout_width="@dimen/square_size_expanded"
        android:layout_height="@dimen/square_size_expanded"
        android:background="@drawable/rect"
        android:gravity="center"/>

</RelativeLayout>
scene 2
<RelativeLayout
    android:id="@+id/container"
    xmlns:android="http://schemas.android.com/apk/res/android"
    android:layout_width="match_parent"
    android:layout_height="match_parent">

    <View
        android:id="@+id/transition_square"
        android:layout_width="@dimen/square_size_normal"
        android:layout_height="@dimen/square_size_normal"
        android:background="@drawable/rect2"
        android:gravity="center"/>

</RelativeLayout>
使用Scene的api主要是TransitionManager:
// BEGIN_INCLUDE(instantiation_from_view)
// A Scene can be instantiated from a live view hierarchy.
mScene1 = new Scene(mSceneRoot, (ViewGroup) mSceneRoot.findViewById(R.id.container));
// END_INCLUDE(instantiation_from_view)

// BEGIN_INCLUDE(instantiation_from_resource)
// You can also inflate a generate a Scene from a layout resource file.
mScene2 = Scene.getSceneForLayout(mSceneRoot, R.layout.scene_custom2, getActivity());
// END_INCLUDE(instantiation_from_resource)
TransitionManager.go(mScene2/*, newTransition()*/);
实现的效果和ppt是类似的,整个过程没有自定义太多东西,默认即可以实现位移,缩放,以及属性变化。
@RequiresApi(api = Build.VERSION_CODES.O)
Transition newTransition(){
    AutoTransition transition = new AutoTransition();
    transition.addListener(new TransitionListenerAdapter() {
        @Override
        public void onTransitionStart(Transition transition) {
            super.onTransitionStart(transition);
            View view = mSceneRoot.findViewById(R.id.transition_square);
            if(view!=null) {
                Log.i("SquareLog", "hashcode=" + view.hashCode());
            }
        }

        @Override
        public void onTransitionEnd(Transition transition) {
            super.onTransitionEnd(transition);
        }
    });
    return transition;
}
QA
这里抛几个问题,通过分析源码来加深对其原理的理解:
- 执行动画中的视图对象,前后是同一个么?
- Scene部分,定义的xml布局作用是什么?
- 动画过程的实现原理是什么?
- 反复执行相同动画,内存是否会持续增长?
Scene分析
Scene的字面意思是场景,具体含义可以参考注释:
/**
 * A scene represents the collection of values that various properties in the
 * View hierarchy will have when the scene is applied. A Scene can be
 * configured to automatically run a Transition when it is applied, which will
 * animate the various property changes that take place during the
 * scene change.
 */
简单来说,Scene一个待变化的目标集合,目标是view和他的属性。这些目标内容再scene被应用的时候会自动执行过渡,通过动画来变更值。
android/transition/Scene.java
其源码中主要成员是一个View容器引用,目标对象的根节点或者layout的id,再者就是两个监听器。
private Context mContext;
private int mLayoutId = -1;
private ViewGroup mSceneRoot;
private View mLayout; // alternative to layoutId
Runnable mEnterAction, mExitAction;
在前面实例化Scene的时候使用了一个静态函数getSceneForLayout。
通过setTag,会把一个缓存集合SpareArray绑定到容器View的值为com.android.internal.R.id.scene_layoutid_cache的tag上面。
他的作用是作为轻量的缓存使用,当对一个容器View多次通过layout来实例化Scene的时候,保证同一个layout得到同一份Scene对象。
另外还有两个方法比较重要:
- enter 将Scene对应的layout加入容器View,并执行监听器
- exit 执行监听器
enter的时候会清空容器View的子节点,然后添加layout,exit时需要判断当前Scene的状态。
// Apply layout change, if any
if (mLayoutId > 0 || mLayout != null) {
    // empty out parent container before adding to it
    getSceneRoot().removeAllViews();

    if (mLayoutId > 0) {
        LayoutInflater.from(mContext).inflate(mLayoutId, mSceneRoot);
    } else {
        mSceneRoot.addView(mLayout);
    }
}
根据添加layout的逻辑,我们可以知道,多次执行动画过程中view是否为同一个?
当以layout id添加时,每次都是不同的view。当以view添加时,每次都是同一个view。这个结论对分析内存和实例对象比较重要。
整个Scene的职责基本就是这些,因此光靠Scene是不能实现转场效果的,他只是负责了记录状态,替换动画对象View。
TransitionManager分析
TransitionManager的文档注释比较长,好在第一句就是重点:
This class manages the set of transitions that fire when there is a change of Scene.
默认使用的Transition是AutoTransition,可以通过setTransition函数为Scene绑定自定义的Transition。
Transition的绑定关系是通过一个ArrayMap保存。
ArrayMap<Scene, Transition> mSceneTransitions = new ArrayMap<Scene, Transition>();
public void setTransition(Scene scene, Transition transition) {
    mSceneTransitions.put(scene, transition);
}
除此还有一个更复杂的,存储了from,to的场景。
ArrayMap<Scene, ArrayMap<Scene, Transition>> mScenePairTransitions =
            new ArrayMap<Scene, ArrayMap<Scene, Transition>>();
public void setTransition(Scene fromScene, Scene toScene, Transition transition) {
    ArrayMap<Scene, Transition> sceneTransitionMap = mScenePairTransitions.get(toScene);
    if (sceneTransitionMap == null) {
        sceneTransitionMap = new ArrayMap<Scene, Transition>();
        mScenePairTransitions.put(toScene, sceneTransitionMap);
    }
    sceneTransitionMap.put(fromScene, transition);
}
执行Scene的切换,会调用到changeScene函数:
private static void changeScene(Scene scene, Transition transition) {

    final ViewGroup sceneRoot = scene.getSceneRoot();
    if (!sPendingTransitions.contains(sceneRoot)) {
        if (transition == null) {
            scene.enter();
        } else {
            sPendingTransitions.add(sceneRoot);

            Transition transitionClone = transition.clone();
            transitionClone.setSceneRoot(sceneRoot);

            Scene oldScene = Scene.getCurrentScene(sceneRoot);
            if (oldScene != null && oldScene.isCreatedFromLayoutResource()) {
                transitionClone.setCanRemoveViews(true);
            }

            sceneChangeSetup(sceneRoot, transitionClone);

            scene.enter();

            sceneChangeRunTransition(sceneRoot, transitionClone);
        }
    }
}
默认是有Transition的,逻辑流程
- 加入pending队列,key是容器View
- clone一份Transition(默认的是static成员)实例,绑定容器View
- 从容器View的tag中获取当前的Scene对象,如果存在且是通过layout id加载的,则标记可移除
- 执行setup
- 通过Scene替换动画的view,enter函数前面分析过
- 执行change函数
setup的逻辑包括三部分:暂停当前running的Transition,记录view的属性,具体实现在Transition的captureValues函数中,最后通知之前一个Scene的exit。
在captureValues中涉及很多集合数据的保存,AutoTransition是一个Set,包括了Fade,ChangeBounds,我们看下ChangeBounds的实现:
private void captureValues(TransitionValues values) {
    View view = values.view;

    if (view.isLaidOut() || view.getWidth() != 0 || view.getHeight() != 0) {
        values.values.put(PROPNAME_BOUNDS, new Rect(view.getLeft(), view.getTop(),
                view.getRight(), view.getBottom()));
        values.values.put(PROPNAME_PARENT, values.view.getParent());
        if (mReparent) {
            values.view.getLocationInWindow(tempLocation);
            values.values.put(PROPNAME_WINDOW_X, tempLocation[0]);
            values.values.put(PROPNAME_WINDOW_Y, tempLocation[1]);
        }
        if (mResizeClip) {
            values.values.put(PROPNAME_CLIP, view.getClipBounds());
        }
    }
}

@Override
public void captureStartValues(TransitionValues transitionValues) {
    captureValues(transitionValues);
}

@Override
public void captureEndValues(TransitionValues transitionValues) {
    captureValues(transitionValues);
}
可以看到他会记录View的的位置信息。
最后一步是执行了change函数,也就是当view已经替换完成,后需要一个时机去触发Transition的执行,可以看到这里绑定了两个监听器,
addOnAttachStateChangeListener和addOnPreDrawListener。
private static void sceneChangeRunTransition(final ViewGroup sceneRoot,
        final Transition transition) {
    if (transition != null && sceneRoot != null) {
        MultiListener listener = new MultiListener(transition, sceneRoot);
        sceneRoot.addOnAttachStateChangeListener(listener);
        sceneRoot.getViewTreeObserver().addOnPreDrawListener(listener);
    }
}
两个接口的的实现类是MultiListener:
/**
 * This private utility class is used to listen for both OnPreDraw and
 * OnAttachStateChange events. OnPreDraw events are the main ones we care
 * about since that's what triggers the transition to take place.
 * OnAttachStateChange events are also important in case the view is removed
 * from the hierarchy before the OnPreDraw event takes place; it's used to
 * clean up things since the OnPreDraw listener didn't get called in time.
 */
触发动画的函数在onPreDraw中,调用了Transition的playTransition函数:
/**
 * Called by TransitionManager to play the transition. This calls
 * createAnimators() to set things up and create all of the animations and then
 * runAnimations() to actually start the animations.
 */
void playTransition(ViewGroup sceneRoot) {
    mStartValuesList = new ArrayList<TransitionValues>();
    mEndValuesList = new ArrayList<TransitionValues>();
    matchStartAndEnd(mStartValues, mEndValues);

    ArrayMap<Animator, AnimationInfo> runningAnimators = getRunningAnimators();
    int numOldAnims = runningAnimators.size();
    WindowId windowId = sceneRoot.getWindowId();
    for (int i = numOldAnims - 1; i >= 0; i--) {
        Animator anim = runningAnimators.keyAt(i);
        if (anim != null) {
            AnimationInfo oldInfo = runningAnimators.get(anim);
            if (oldInfo != null && oldInfo.view != null && oldInfo.windowId == windowId) {
                TransitionValues oldValues = oldInfo.values;
                View oldView = oldInfo.view;
                TransitionValues startValues = getTransitionValues(oldView, true);
                TransitionValues endValues = getMatchedTransitionValues(oldView, true);
                if (startValues == null && endValues == null) {
                    endValues = mEndValues.viewValues.get(oldView);
                }
                boolean cancel = (startValues != null || endValues != null) &&
                        oldInfo.transition.isTransitionRequired(oldValues, endValues);
                if (cancel) {
                    if (anim.isRunning() || anim.isStarted()) {
                        if (DBG) {
                            Log.d(LOG_TAG, "Canceling anim " + anim);
                        }
                        anim.cancel();
                    } else {
                        if (DBG) {
                            Log.d(LOG_TAG, "removing anim from info list: " + anim);
                        }
                        runningAnimators.remove(anim);
                    }
                }
            }
        }
    }

    createAnimators(sceneRoot, mStartValues, mEndValues, mStartValuesList, mEndValuesList);
    runAnimators();
}
这段代码大部分是移除running的属性动画,由此我们也知道了转场框架内部实现,用的就是属性动画:
// The set of animators collected from calls to createAnimator(),
// to be run in runAnimators()
ArrayList<Animator> mAnimators = new ArrayList<Animator>();
protected void runAnimators() {
    if (DBG) {
        Log.d(LOG_TAG, "runAnimators() on " + this);
    }
    start();
    ArrayMap<Animator, AnimationInfo> runningAnimators = getRunningAnimators();
    // Now start every Animator that was previously created for this transition
    for (Animator anim : mAnimators) {
        if (DBG) {
            Log.d(LOG_TAG, "  anim: " + anim);
        }
        if (runningAnimators.containsKey(anim)) {
            start();
            runAnimator(anim, runningAnimators);
        }
    }
    mAnimators.clear();
    end();
}
属性动画实例的创建在Transition对象的createAnimator函数中,例如前面提到的ChangeBounds,代码过长这里就不贴。
android/transition/ChangeBounds.java#createAnimator
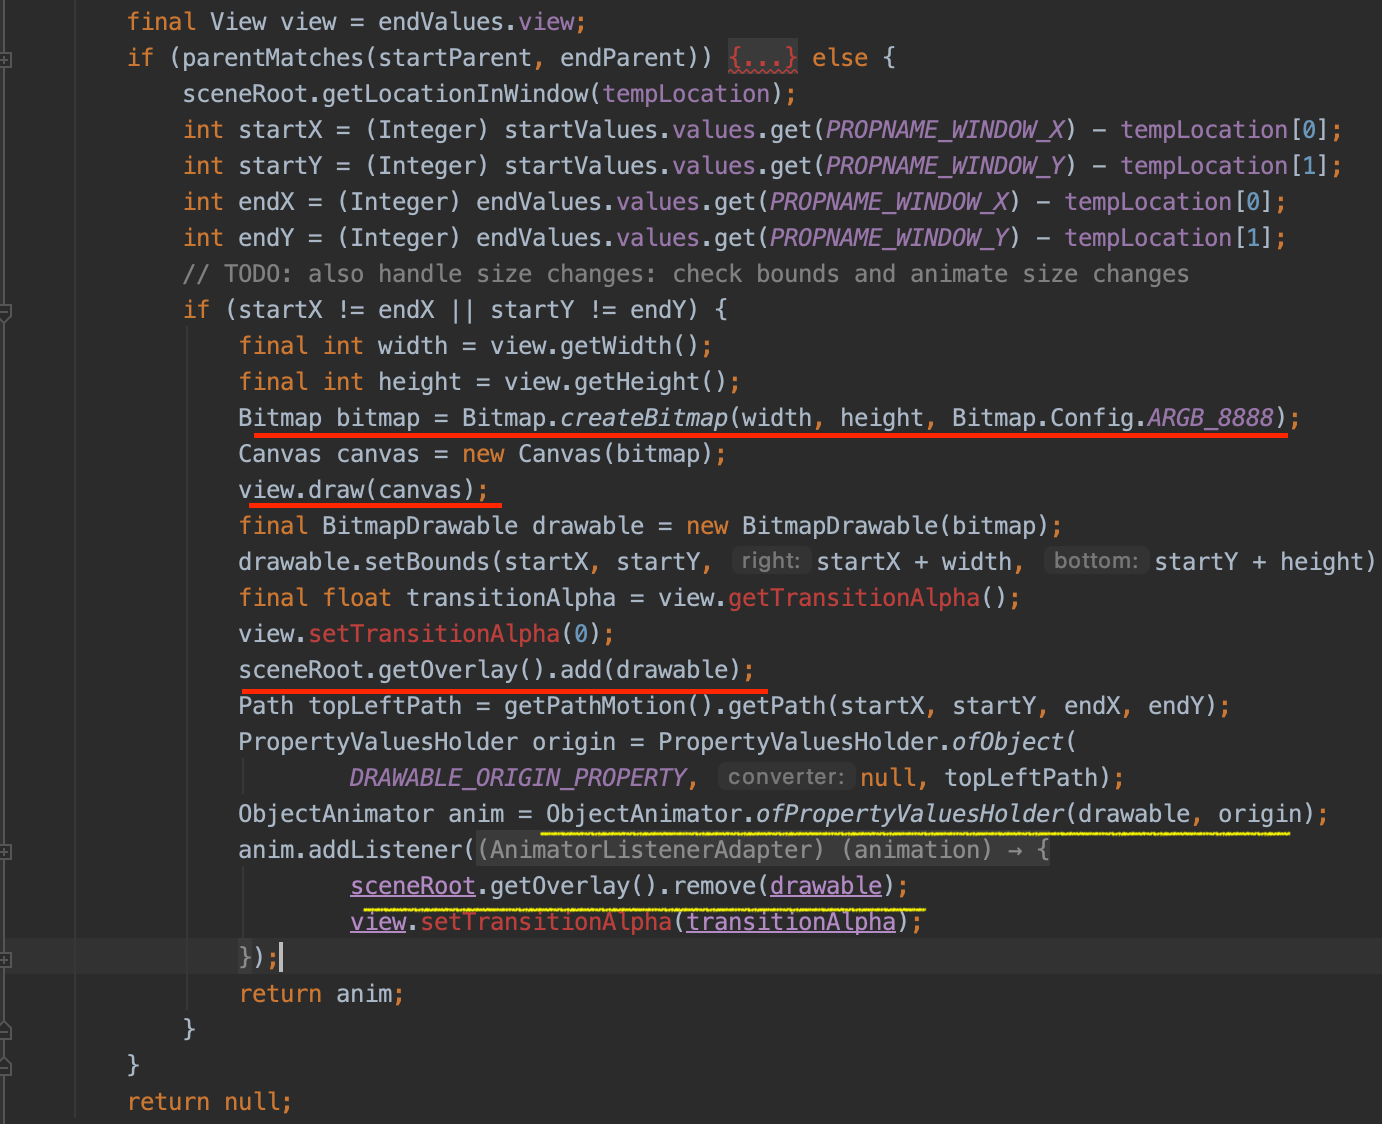
里面有两点可以关注,根据start和end的parent view的判断,有两种处理情况:
- parent view相同是,通过view的setLeftTopRightBottom来改变位置
- 不同时,通过View的sceneRoot.getOverlay()上添加drawable来绘制效果
小结
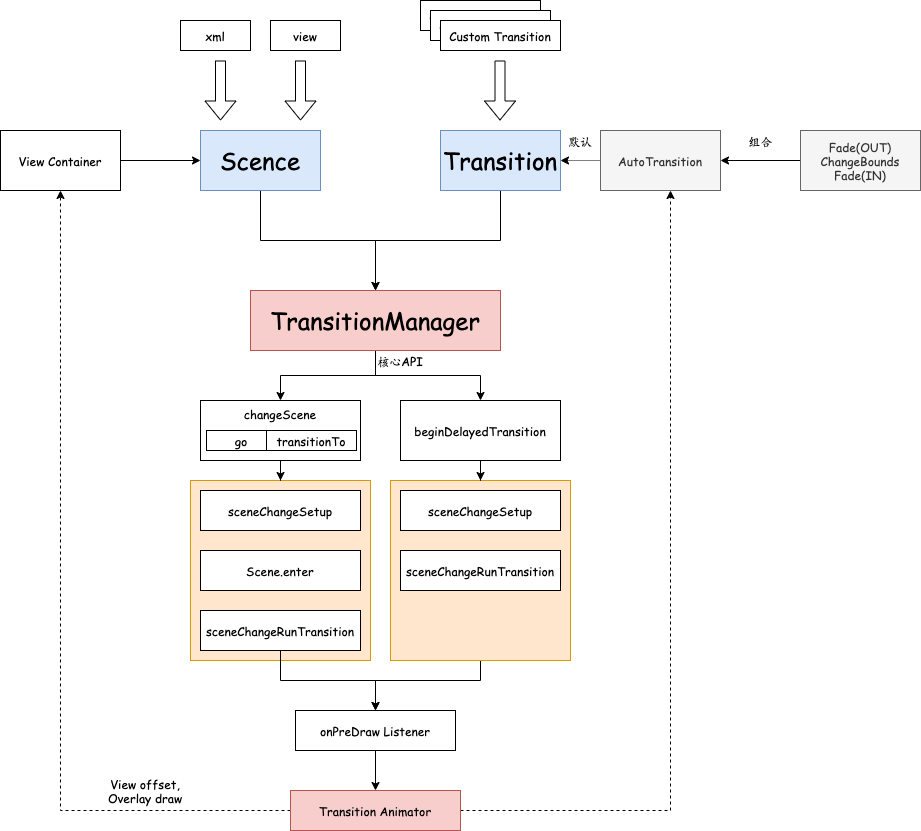
现在我们基本上了解的Transition框架的使用和原理,画一张图整体回顾一下。
这里的Transition框架只能用于当前Activity,跨Activity需要采用共享元素的方案Start an activity using an animation